Experiential Learning (EL) Activities

Experiential learning creates a deeper understanding of course content, promotes critical thinking and problem-solving, and allows students to actively participate, reflect, and apply new knowledge and skills. The goal of Civil Engineering Experiential Learning (EL) activities encompass lifelong learning, design process, and embodying interdisciplinary interventions for solving open ended problems. Experiential learning activities provide opportunities for students to explore the synergies between different disciplines. By engaging in hands-on projects and practical applications, students not only enhance their theoretical understanding but also develop crucial skills and insights that are vital for success in the modern world.


EL Coordinator: Dr. Shweta Goyal


Semester 1: Design and Analysis of truss bridge


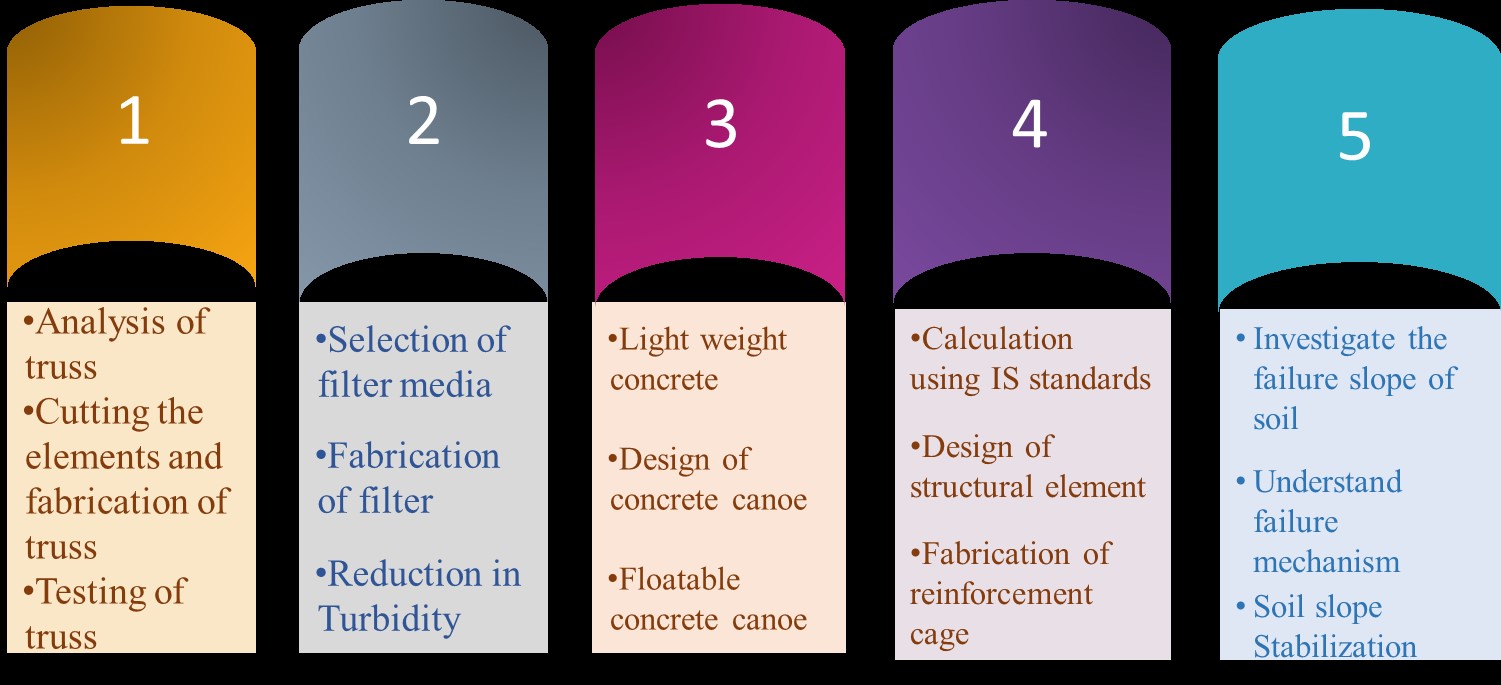
Designing is one of the critical components of Civil Engineering. Only by actively participating in the design process we can completely comprehend the challenges and rewards of engineering. This activity will introduce first year students to core civil engineering aspects and real-world situations that involves bridges, roof trusses and various building sections. In this learning activity, students will construct a truss bridge structure from the provided materials. This activity will provide Students with valuable preparation for learning how to design a structure. Students will be able to observe how the structure works and understand about various structural members and the joint system. The group will comprise maximum of 5 members.

Faculty Facilitator

Dr. Arpit Goyal
Dr. Pratik Tiwari

The basic outline of the activity is:


  • To learn about basic concept about the truss, its components and type of truss bridges which serves as prerequisites for building and analyzing a truss model.
  • To identify compression, tension and zero-force members in the design to decide the material to be used for each member. Group can remove the zero-force members to make design more cost-effective.
  • To construct a truss bridge from the provided materials considering the self-weight and cost of the structure. Each extra material required other than provided will increase the cost.
  • To test the constructed bridge to the maximum failure load.


After going through this activity the students would be able to:

  • Identify major components of a truss bridge and materials used for construction.
  • Identify the types of truss bridges.
  • Fundamental structural engineering concepts: compression, tension, flexure.
  • Contribution of each individual component to the stability of the entire structure.
  • How construction quality affects the performance of a structure.


Semester 2: Deployment of a filtration unit in a municipal area


This ELC activity was planned for BE-First Year Civil Engineering Students. This activity was a group activity. At this stage, students are aware about water quality but talking in terms of water quality parameters is not in their look around. Therefore, the purpose of this activity was to make students illustrate water quality in terms of water quality parameters. Water quality parameter taken for this activity was Total Suspended Solids (TSS), as it is simpler to understand and comprehend. With an introductory lecture, on understanding TSS, why it is undesirable and how it can be controlled.

Faculty Facilitator

Dr. Richa Babbar

The basic outline of the activity is:


Students were expected to undertake the activity in the following steps:

  • Form groups
  • Conduct survey on different type of materials that can be used as a filter media
  • Design gravity filter including fabricating a container with a provision for collecting the sample
  • Take percentage reduction in turbidity, rate of filtration and cost of filter unit as variables
  • Determine the trade- off between these three variables 6. Achieve an optimized filter model.


At the end of ELC activity, students have knowledge of

  • Gravity filters and different types of filter units
  • Drinking standards for turbidity concentration
  • Different materials which can be used in as filter media and type of filter media helpful in turbidity reduction
  • The role of gradation in filter media


Semester 3: Concrete canoe: development of floatable concrete


The goal of this activity is to expose the students to the use of light-weight materials to design a light weight economic concrete mix to carry the self-weight and maximum live load in floating condition. In this activity students learn to apply the guidelines given in Indian standard for product design and fabrication. In this process, they learn about material selection, geometrical design, mould fabrication, casting of concrete, testing and filed implementation of products.


Faculty Facilitators


Dr. Gurbir Kaur

Dr. Vivek Gupta

The basic outline of the activity is:


Concrete Mix Design:

  • Work with materials engineers or concrete experts to develop a custom concrete mix tailored to the specific requirements of the canoe.
  • Select lightweight aggregates such as expanded clay, shale, or perlite to reduce the density of the concrete.
  • Incorporate additives or admixtures to improve workability, reduce permeability, and enhance durability.
  • Conduct trial batches and test the properties of the concrete mix, including density, compressive strength, and buoyancy.

Canoe Design and Mold Construction:

  • Design the shape and dimensions of the concrete canoe using CAD software or manual drafting techniques.
  • Construct a mold for the canoe using materials such as wood, foam, or fiberglass. Ensure the mold is smooth and accurately reflects the desired shape of the canoe.
  • Consider factors such as hull shape, rocker profile, and stability to optimize the performance of the canoe.

Concrete Casting:

  • Prepare the mold surface by applying release agents or sealants to facilitate easy removal of the cured concrete.
  • Mix the custom concrete according to the developed mix design, ensuring proper proportions of aggregates, cement, water, and admixtures.
  • Pour the concrete into the mold in multiple layers, vibrating or tamping each layer to remove air bubbles and achieve uniform compaction.
  • Allow the concrete to cure and gain sufficient strength before demolding, typically for several days to a week depending on the mix and environmental conditions.

Finishing and Reinforcement:

  • After demolding, inspect the canoe for any imperfections or defects and make any necessary repairs or adjustments.
  • Apply surface treatments or coatings to enhance the appearance, durability, and hydrodynamics of the canoe.
  • Install internal reinforcement elements such as fiberglass or carbon fiber ribs, keel strips, and gunwales to improve structural integrity and stiffness.

Testing and Evaluation:

  • Conduct flotation tests to verify the buoyancy and stability of the concrete canoe in water.
  • Perform structural tests to evaluate the strength, stiffness, and durability of the canoe under simulated loading conditions.
  • Collect data on performance metrics such as weight, displacement, deflection, and speed to assess the effectiveness of the design and construction.


Semester 4: REINFORCEMENT DETAILING OF STRUCTURE ELEMENTS


In this activity, students are given a building, firstly they need to determine the dimensions of all structural elements, such as beams, columns and slab. Further, they need to calculate the loading acting on these elements and also they have to use the Indian standard codes to determine the self-weight of structural elements using unit weight material. Based on the load calculation, students have to design the structural elements using IS 456:2000 and develop the reinforcement detailing of structural elements. At the end, using reinforcement drawings, students have to fabricate the reinforcement cage using steel wires.

Faculty Facilitator

Dr. Himanshu Chawla

The basic outline of the activity is:


  • Load calculation of existing structural members of building
  • Design of structural elements along with reinforcement detailing
  • Fabrication of reinforcement cage


After going through this activity the students will be able to :


  • Involve Design Process in Building Design and enhancement in Engineering Vocabulary.
  • Comparison of three-dimensional reinforcement plan with theoretically studied two-dimensional reinforcement plan.
  • Physical exposure about the significance of the quality placement of reinforcement and inspection of reinforcement cage before concreting.
  • Preparation of cross section and plan of scale model (reinforcement cage).
  • Attained the ability to think critically, team management, team cooperation and safety requirements while preparing the reinforcement cage.


Semester 5: Slope stability analysis of soil


The objective of this activity is to expose students to the basics of the heat exchangers, concepts, materials, temperature and flow measurement techniques, etc. Students learn computational fluid dynamics, importance of controllable parameters, overall dimensions, and  fabrication of a plate type heat exchanger.


Faculty Facilitator


Dr. Aditya Parihar

Mr. Rajesh Pathak

The basic outline of the activity is:


Introduction to Slope Stability:

  • Start by introducing participants to the concept of slope stability and its importance in civil engineering projects.
  • Explain the factors affecting slope stability, such as soil type, slope angle, water content, vegetation, and external loads.

Soil Classification:

  • Provide soil samples of different types (e.g., sandy soil, clayey soil, gravel) and discuss their characteristics, including grain size distribution, cohesion, and internal friction angle.
  • Demonstrate basic soil classification tests, such as the sieve analysis and Atterberg limits tests, to determine soil properties.

Slope Geometry:

  • Introduce participants to different types of slopes (e.g., natural slopes, embankments) and discuss the importance of slope geometry in stability analysis.
  • Demonstrate how to measure slope angle and height using measuring tools.

Hands-on Analysis:

  • Divide participants into groups and assign each group a soil type and slope angle.
  • Provide slope stability software or templates for manual calculations (e.g., circular slip surface method for homogeneous slopes).
  • Have each group conduct a simplified slope stability analysis using the assigned soil type and slope angle, considering factors such as soil strength, pore water pressure, and slope geometry.

Data Interpretation:

  • Have groups interpret their analysis results, including the factor of safety and critical failure surface.
  • Discuss the significance of the results and how they relate to real-world slope stability problems.

Discussion and Conclusion:

  • Facilitate a group discussion on the challenges, assumptions, and limitations of the simplified slope stability analysis conducted.
  • Encourage participants to reflect on the importance of slope stability in engineering design and construction practices
Download Brochure